QuickBooks Online Payroll Subscription: A Detailed Guide
QuickBooks Online Payroll subscription allows users to automate payroll operations to achieve efficiency and effectiveness. In addition, users can access a huge number of benefits from QuickBooks Payroll with multiple options as per their needs. This detailed guide will explain everything about QuickBooks payroll subscription and other crucial details.
Payroll acts as one of the most crucial aspects of a firm’s operations. Since it’s time-consuming to do it manually, users have switched to automated accounting applications to increase productivity and efficiency. QuickBooks has risen to the occasion to become one of the most favourite accounting, bookkeeping, and payroll applications.
One of the best and much-needed additions is QuickBooks Desktop Payroll. With an Intuit payroll subscription, users can do things like calculate payroll taxes, automate payroll record-keeping, download and import transactions easily, and pay employees quickly and easily. Whether you use QuickBooks Desktop or QuickBooks Online, the payroll services and subscriptions are available in both versions. Let’s have a glance at the features, comparisons, and other factors of getting a QuickBooks payroll subscription.
What is QuickBooks Online Payroll Subscription?
Intuit offers QuickBooks Payroll as a service that depends on the subscription plan you use, helping you to manage payroll-related tasks effortlessly and efficiently. It has several features, such as how to calculate employee salaries, estimate and withhold payroll taxes, pay them, and file tax returns through the software.

Both QuickBooks Desktop and QuickBooks Online offer QuickBooks Payroll Subscription packages. Users can choose any that fits their requirements. The packages and pricing differ for each subscription. We’ll shed light on each type so you can get insights into QuickBooks Payroll.
QuickBooks Payroll Subscription Plans
QuickBooks Online payroll subscription price purely depends on the subscription plan you have availed. Many subscription options are available for the QuickBooks Desktop Payroll subscription, including:
| Payroll Core $ 25 per month | Payroll Premium $ 44 per month | Payroll Elite $67 per month |
| full service payroll | ✓ | ✓ |
| Auto payroll | ✓ | ✓ |
| 1099 E-File & Pay | ✓ | ✓ |
| Expert product support | 24/7 product support | ✓ |
| Next-day direct deposit | Same day direct deposit | ✓ |
| Team management tools | Enhanced team management tools | Premium team management tools |
| Employee portal | ✓ | ✓ |
| Track time on the go | Track time and projects on the go | |
| Expert review | Expert Setup | |
| HR. Support Center | HR. Advisor |
Activation of QuickBooks Payroll: A Detailed Overview
Struggling with “How do I subscribe to QuickBooks Online Payroll?” This section of this blog addresses this question. Keep reading it till the end, so that you can really understand how you can subscribe to QuickBooks Online Payroll. There are two methods to do so, which are as follows:
Step 1: Activate your Payroll Subscription
After you have purchased the payroll subscription of your choice, it’s time for its activation. The activation steps may differ depending on where you bought the subscription- online, a retail store, or by phone.

If you bought QuickBooks Desktop Payroll Assisted, you should follow the steps given in the ” Enter your payroll service key section of the QuickBooks application. Now, you need to activate your monthly payroll subscription with the help of a QB specialist.
Method 1: Enter the payroll service key (if purchased Online or through a phone call)
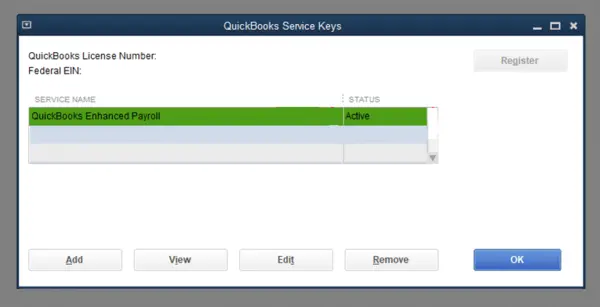
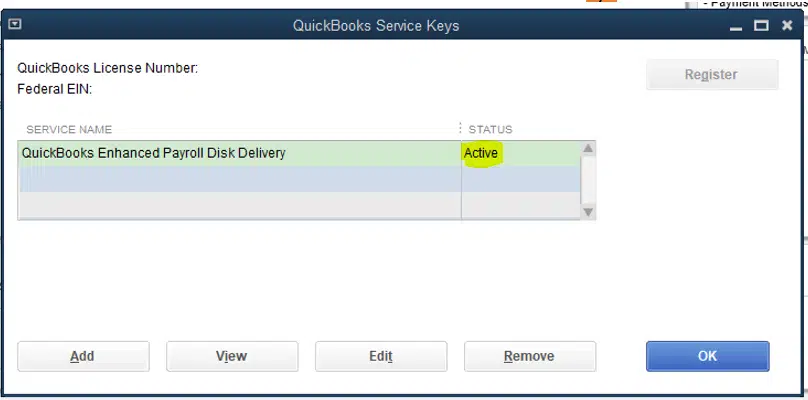
A 16-digit service key will come to your email if you buy QuickBooks Desktop Payroll Basic, Enhanced, or Assisted online or via phone. You need to fill in this 16-digit key in QuickBooks to start using payroll features.
You should search for the key in your spam and junk folders if the email that has the service key isn’t visible in the primary mail section. Intuit also has an automated Service Key Retrieval tool to extract your service key. Your Intuit Account login details will be needed to sign in and use the tool.
The steps to enter your service key are as follows:

- Open your QuickBooks Desktop company file.
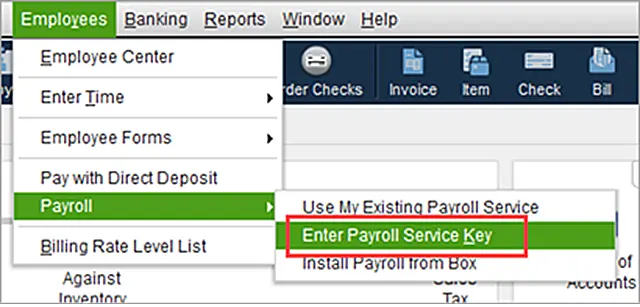
- Click on the Employees option, then navigate to the Payroll option.
- Next, go to the Enter Payroll Service Key option or the Manage Payroll Service Key option if you have an older QB version.
- Click on Add. You can choose the Edit option if a payroll service key is already registered.
In that case, you’ll need to follow the steps below:
- Remove the payroll service key that is listed there.
- Now, type your service key here, and then click on Next, and then finally click the Finish button.
- A payroll update message will appear on the screen. Click on OK.
Method 2: Steps to Activate a Subscription Bought from a Retail Store
If you have purchased the QB Desktop Payroll subscription from a retail store, the following steps should be followed:
- Open your QuickBooks Desktop company file.
- Click on the Employees menu and navigate to the Payroll option.
- Now go to the Install Payroll from checkbox.
- By this, the Payroll License and Product Information Page appear on your screen. Enter the required details. Your license number will be written or present on the brightly coloured sticker in the box’s folder. The directions in the folder include the product number. The 16-digit service key to enter may appear afterwards.
- Click on the Continue option and make sure to follow the instructions that appear on your screen to finish the activation process of your Payroll. Type in your payroll service key here.
Step 2: Fill in the Payroll Online Application OR make a Payroll Pin for QuickBooks Desktop Payroll
This step includes payroll activation, which also includes integrating your bank account for using direct deposit, and letting the program pay and file your payroll taxes. The steps to follow to put this method to use are as follows:
- Collect your Business and Principal Officer Info
- Collect the important information that is given below:
- Note down the legal name of your business, address, and Federal Employer Identification Number (FEIN) in a secure place.
- Make sure you have the details of the principal officer, which include their name, home address, Social Security Number, date of birth, etc. Because the Principal Officer has the authorized signature on your business bank account.
- Ensure that you know the online User ID and password of your business bank account.
Note: You should also know the routing and account number of the account which are responsible for making direct deposit and payroll tax transactions.
Finish the Online Application
The steps to complete your online application are as follows:
- Click on the Employees option, then navigate to the My Payroll Service option.
- Now, go to the Activate Assisted Payroll option.
- Answer all the on-screen prompts or questions and fill in the required details.
- Create a payroll PIN, which should be of 8-12 characters with letters and numbers, excluding any special characters.
Final Thoughts
We have come to the end of this blog. This blog has thoroughly covered how one can enrol, activate, and reactivate a QuickBooks subscription as per the requirements of the user. In case you still have some doubts about the subscription plans or anything in general about the QuickBooks application, consider calling our QB ProAdvisors at our toll-free number +1-866-408-0444. We would be beyond pleased to help you.
Frequently Asked Questions (FAQ’s)
1. How does a QuickBooks subscription work?
QuickBooks Online is a subscription-based product that gives you the freedom to work on the go. You can access and sync data across all your devices – computer, tablet, and smartphone. Your data is securely backed up, and you have instant access to the latest product and feature updates.
2. What are the payment options for a QuickBooks subscription?
This can be a credit card (Visa, Mastercard, American Express, or Discover), direct debit, PayPal, or Automated Clearing House (ACH). A US billing address (not including US territories) for your card. This doesn’t have to match the physical billing address in your QuickBooks settings.
3. How do I cancel my QuickBooks subscription?
To cancel your QuickBooks subscription, follow these steps: Sign in to your QuickBooks account through the QuickBooks website. Click on the “Gear” icon in the top right corner and select “Billing Info”. On the Billing Info page, scroll down and click on the “Cancel Subscription” button.
4. Will I get a refund if I cancel my QuickBooks subscription?
If you’re within the 60-day money-back guarantee period and your product was purchased directly from Intuit, you’ll automatically receive a refund for the full purchase price of your subscription. If applicable, you’ll receive your refund within two weeks.
5. Is there a free QuickBooks subscription?
Your QuickBooks Online free trial gives you 30 days of full access to all the popular accounting features and benefits included in your chosen plan (Simple Start, Essentials, Plus, or Advanced).
Related Posts-
Troubleshooting QuickBooks Payroll Not Withholding Taxes
QuickBooks Payroll Update Not Working? Fix It Now
Easy Way to Create and Send Purchase Orders in QuickBooks Online
Complete Steps For Intuit Workforce Login
Fix QuickBooks Payroll Error PS038 – Get Your Payroll Updates

E-File Your taxation form smoothly & Get Professional QB Help with the following forms:
Form 1040, Form W-2, Form 1099-NEC, Form 1099-MISC, Schedule C, Form 941, Form 940, Form 1065, Form W-9
Receive instant and step-by-step assistance for stress-free form filing.
Recent Posts
-
Fix QuickBooks Error 40003 When Updating Payroll Tax Table
-
Everything You Must Know About QuickBooks I-9 Form
-
How to File & Print W-4 Form in QuickBooks Online?
-
Resolve QuickBooks Error 1935 & Regain QuickBooks Installation
-
How to File IRS Form 1040 Smoothly Using QuickBooks


