
 Accounting
Running the QuickBooks Database Server Manager is important for successfully hosting your company files over the network. It allows multiple users to access and work on the same QuickBooks company file concurrently over a network, enabling collaborative work and efficient data sharing.
When doing the same, you may experience the QuickBooks Database Server Manager stopped issue when trying to update the tool, run the QuickBooksDBXX service, or perform other processes on the multi-user access.
To resolve this, try restarting the QuickBooks Database Server Manager service, checking your network connectivity, and ensuring your firewall and antivirus settings aren’t blocking QuickBooks. This comprehensive guide will help you fix the same issue in different scenarios. Make sure to perform all the solutions carefully.
Why is QuickBooks Database Server Manager not running?
It is quite common to wonder why QuickBooks Database Server Manager has stopped suddenly, as it stops you from sharing the company file over the network. We will explore the possible factors hampering the network connectivity so that finding the fixes can be easier:
- Your QuickBooks Desktop might not be set up for multi-user connection.
- Common network connectivity issues.
- Any damage or corruption to your company file data.
- Windows Firewall might be blocking QuickBooks Desktop due to incorrect permissions.
- The QuickBooks Database Service Manager services might be configured incorrectly.
- Issues with the install location of QBDSM.
- Any damages to the QBDataServiceUserXX.
- Any issues with the QBCFMonitorService.exe can also hamper QBDSM.
- Lost connection between the server and your workstations.
QuickBooks Database Server Manager status STOPPED? Here’s what to do
Both QuickBooks Database Server Manager must be running to share the company file over the network. Not running any of these may result in QBDSM crashes and interrupt network connectivity. There can be different scenarios when you face a similar issue.
Let us discuss these different cases in detail and give step-by-step troubleshooting solutions for each:
General Solutions
These solutions help you run the QuickBooks Database Server Manager seamlessly, regardless of the scenario or situation. Before moving further, use the latest version and release of QuickBooks Desktop.
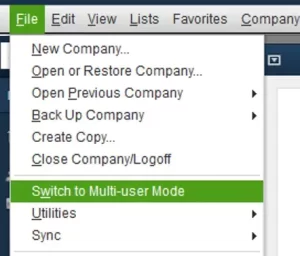
1. Check QuickBooks Multi-User Hosting set up on the server
Let’s review your server computer’s hosting settings to see if it allows you to access company file shares, which could be the reason why your QuickBooks Database Server Manager stopped:
- Launch QuickBooks on your server computer.
- Navigate to File and choose Utilities.
- In case the option is Switch to Single-user Mode, don’t select it.
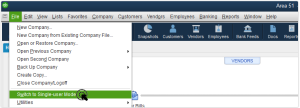
- If you see the option to Switch to Multi-user Mode, select it.
2. Run QuickBooks File Doctor
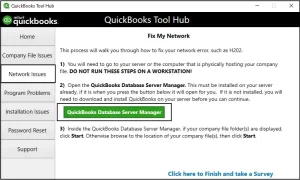
The QuickBooks File Doctor scans your company file and runs a quick fix to your company file and the related network issues. To access the utility, you must download and install the QuickBooks Tool Hub to the latest release.
- Select the Company File Issues in the Tool Hub.
- Hit on Run QuickBooks File Doctor. The tool might take up to one minute or more to open and scan your file; wait until then.
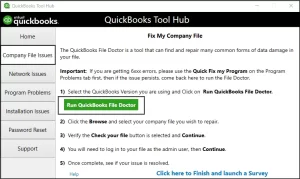
Note: if you fail to open QuickBooks File Doctor to open, search for QuickBooks Desktop File Doc and open it manually.
- Now, choose your company file from the dropdown menu in the QB File Doctor. If you don’t see the file, click on Browse and search to find your file.
- Hit on Check your file and then Continue.
- Allow access by entering the QuickBooks admin password and click Next.
The scan time depends on the size of your file, and it may take 10-15 minutes. Even if the scan is successful, it may say unsuccessful. Once the scan finishes, launch QuickBooks and open your company file.
3. Verify and Rebuild Data
The Verify and Rebuild Data utility verifies the data integrity of your company file and rebuilds the found data damage, as the data damage can be why the QuickBooks Database Server Manager stopped the issue.
Verify the company file data
- Go to Window in QuickBooks and select Close All.
- Navigate to File and then click on Utilities.
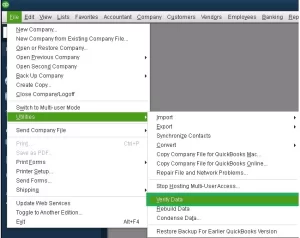
- Click on Verify Data. If you see:
– QuickBooks detected no problems with your data – your data is clean and safe, and you don’t need to do anything else.
– An unknown error message – check our website for relevant troubleshooting articles.
– Your data has lost integrity – Data damage was found, and you need to rebuild it to fix the issues.
Rebuilding the data damages
- Go to File at the top of your screen.
- Choose Utilities and then Rebuild Data.
- Now, QuickBooks will ask you to create a backup before rebuilding the company file; click OK. A backup before rebuilding ensures your data is safe.
- Choose the location where you want to save your backup copy, and then OK. Do not replace the existing file when saving the backup copy. Enter a unique name in the File name and select Save.
- Click OK once you receive the message Rebuild has completed.
4. Check your firewall and antivirus permissions
The Windows firewall may block your QuickBooks Desktop and all the related processes, making it a threat to your computer due to incorrect settings. In that case, you must configure the Windows Firewall and antivirus permissions to enjoy advanced accounting using QuickBooks and share your company files with other users without any issues.
If any of these don’t help you access the data file on the network, consider moving to the solutions below based on different cases.
If you’re trying to update QuickBooks Database Server Manager on the server computer
Updating your QuickBooks Database Server Manager on the server computer but failing to do so? This happens when your QuickBooks Database Server Manager failed to start even before updating with QuickBooks error 1920 on your screen.
Try reinstalling the Server Manager to make sure there re no issues associated with the program file and resolve the issue:
a. Uninstall the QuickBooks Database Server Manager
First, remove Server Manager from your server computer by following the steps below:
- Press the Windows logo+R keys simultaneously on your keyboard.
- This will open the Run dialog box.
- In the Run field, enter appwiz.cpl, then click OK.
- Now, choose QuickBooks Database Server Manager to open.
- Click on Uninstall/Change and then follow the onscreen instructions.
b. Rename the installation folders
Renaming the installation folder will replace the old files with the new ones, fix the related issues, and allow you to run QBDSM:
Important notes:
- If you can’t find the Application Data or Program Data folder, display the hidden files and folders. You can also manually search for files using Windows.
- In case use other Intuit apps on your computer, just uninstall or rename the QuickBooks version folder found in the Intuit folder: C:\Program Data\Intuit.
- Locate the Intuit folders.
- Use the below chart as reference:
-
C:\Program Data\Intuit
C:\Program Data\Intuit
C:\Program Data\Common Files\Intuit
C:\Program Data\Common Files\Intuit
C:\Users\[Username]\AppData\Local\Intuit
C:\Users\\AppData\Local\Intuit
C:\Program Files\Intuit
C:\Program Files\Intuit
C:\Program Files\Common Files\Intuit
C:\Program Files\Common Files\Intuit
- Launch the Run command (Windows+R) on your computer.
- Enter the location of the folder, or simply copy and paste and hit Enter.
- Right-click on the folder, then choose Rename.
- Add .OLD at the end of the file name and save it.
c. Reinstall QuickBooks Database Server Manager
Reinstalling the QuickBooks Database Server Manager helps you fix issues with multi-user access, resolve errors, or ensure compatibility with your QuickBooks Desktop version.
a. Install Database Server Manager
On your main computer, where you host the company file, follow the steps below to install QuickBooks Database Server Manager.
Important: If you use multiple versions of QuickBooks Desktop on your network or are an accountant, you must install them in order. Install the older version first and then end with the most recent one.
- Close all the programs running on your computer including QuickBooks.
- Locate the downloaded file with the QuickBooks program: Setup_QuickBooks.exe.
- Follow the instructions displayed on your screen. Forgot your product license number? Here’s how to get them:
– Open QuickBooks.
– Press the F2 key on your keyboard.
– In the prompted Product Information window, find your product name, product number, and license number and note down them. - Select Custom and Network Options when QuickBooks asks you to choose the install type. Do not select Express.
Note: The Express option installs QuickBooks Desktop over the existing QuickBooks version. When installing again, you might need the previous one for comparison and troubleshooting purposes.
– If you want to use QuickBooks Database Server Manager and QuickBooks Desktop on the server computer, choose I’ll be using QuickBooks Desktop on this computer, AND I’ll be storing our company file here so it can be shared over out network. It Is highly recommended to select this option.
– If you only want to use QuickBooks Database Server manager on the server computer, select I will NOT be using QuickBooks Desktop on this computer. - Follow the rest of on-screen instructions. When all set, click Install. Windows may ask your permissions, ensure to grant them.
Note: For every edition of Database Server Manager, QuickBooks generates a new Windows user. Database Server Manager 2023, for instance, appears as QBDataServiceUser33.
b. Configure Database Server Manager
You can skip these steps if you want to use the default settings. Otherwise, proceed with the below to configure them.
- Press the Windows logo key to open the Windows Start menu.
- In the search, type Services and select Services from the search results to open.
- Choose QuickBooksDBXX (XX is the version number) and open it.
- Move to the Services tab and scroll down to Service status. If it says Started or Running, select Stop.
- Select Automatic from Startup type.
- Navigate to Logo and choose Local System account.
- From the Recovery tab, select Restart the Service from each of these: First failure, Second failure, and Subsequent failures.
- Move back to the General tab and click Start to restart Database Server Manager.
Important notes:
- You must ensure the Windows Firewall permissions are configured for QuickBooks Database Server Manager.
- Check the QBDSM scan your company files for sharing on the network.
The QuickBooksDBXX service on Local Computer started and then stopped
The sudden failure to run the QuickBooksDBXX service on Local Computer can be caused due to a a damaged QuickBooks Database Server Manager. Try the following solutions to resolve the issue.
1. Configure services
Let’s configure the QuickBooks Database Server Manager services to verify that the utility is not damaged and you can run them seamlessly:
- Press Windows+R to launch the Run prompt on your system.
- Type services.msc in the Run prompt and click OK. You can also search on your Windows for services.msc in search bar.
- In the prompted service window, find the QuickBooksDBXX service that matches your QB version:
– QuickBooks 2020: QuickBooksDB30
– QuickBooks 2019: QuickBooksDB29
– QuickBooks 2018: QuickBooksDB28 - Now, locate and double-click on QuickBooksDBXX service.
- Set your Startup type to Automatic and the Service Status should be Running or Started.
- Move to the Recovery tab.
- Choose Restart the Service from the First failure drop-down. Doing this will automatically restart the QuickBooksDB service if it fails. Now, preform the same step for Second failure and Subsequent failures.
- Click OK to save these changes.
- Finally, reboot your computer.
2. Change the install location
Reinstalling QuickBooks Desktop on a different location makesensures there are no issues with the program file location and replaces these files with the ones, fixing all the associated issues. Learn how to change the install location of QuickBooks and QuickBooks Database Server Manager:
Note: Being a component of QuickBooks Desktop, it will automatically download on your system.
Before starting
- Get the installer version of the same as your QuickBooks Desktop.
- Keep the license number noted, which you will find on the original package. Check the confirmation email if you bought it online.
a. Remove QuickBooks Desktop
- Click on the Windows icon on the Taskbar.
- Type Control Panel in the search field and hit Enter.
- Choose Programs and Features or simply click on Uninstall a Program.
- Select the QuickBooks Desktop version you want to remove from the list of programs.
- Click on Uninstall/Change, Remove and then Next.
- If you cannot see the option to uninstall the program, sign out and then sign in back to Windows as an admin.
b. Install QuickBooks again
- Make sure your computer have an active internet connection.
- Locate the QuickBooks.exe file.
- Now, choose
– Express install – This will save all the preferences and install over your previous version of QuickBooks. You’ll need to use custom install to reinstall your previous version to access it.
– Custom and Network Options – This lets you install the new version in a different location and keep prior versions installed. Your prior version preferences are not added to the new version. - Click on Next, then Install.
- When the process is complete, Open QuickBooks.
3. Recreate QBDataServiceUserXX
The QBDataServiceUser account is created by QuickBooks Desktop to manage database connections and services. It allows third-party applications to access QuickBooks company files for data integration and synchronization without requiring administrative access.
When recreating the account, make sure it is not damaged, which might be hampering the multi-user connection and preventing you from running QuickBooks Database Server Manager.
Note: If you encounter an error that states your Windows user account doesn’t have the right permissions, log in to Windows as admin or contact your IT professional.
- Exit QuickBooks Desktop.
- Press the Windows + R keys together to bring up the Run window.
- In the Run field, type services.msc and then hit Enter.
- Right-click the service of your QuickBooks version and choose Properties.
– QuickBooks 2020: QuickBooksDB30
– QuickBooks 2019: QuickBooksDB29
– QuickBooks 2018: QuickBooksDB28 - Navigate to the Log on tab and configure the service to This Account.
Note: Avoid selecting Local System as only some system setups allow it to work on Local System. - Now, remove qbdataserviceuserXX:
– Launch the Windows + R key together to open the Run window.
– In the Run field, type Control Panel and hit Enter.
– Choose User Accounts and then click on Remove user account.
– Select the qbdataserviceuserXX of your QuickBooks version and then click Delete. - Launch QuickBooks Desktop again.
Note: Is the hosting started already? Turn it off and turn it on again. If the hosting isn’t started, enable the hosting. - When asked to run Database Server Manager on the prompt, click OK.
- Open the QuickBooks Database Server Manager and and scan your files. This will automatcailly recreate the qbdataserviceuser.
QBCFMonitorService Not Running Issue
The QBCFMonitorService is one of the QuickBooks Database Server Manager services responsible for hosting the company file. If the service is not running, it means there is a problem with multi-user access. Proceed with the below steps to fix the issue and ensure the QuickBooks Database Server Manager stopped issue is fixed:
1. Restart QBCFMonitorService.exe
Restarting the QBCFMonitorService.exe resolve QuickBooks multi-user issues and errors, ensuring smooth data access and network connectivity. Learn how to restart this service:
- Press Ctrl + Alt + Del keys simultaneously to launch the Task Manager.
- Go to the Processes menu.
- Right-click on the QBCFMonitorService process and click on End Task.
- Click Yes to confirm.
- Launch your QuickBooks Desktop again and run the QBDSM to restart the service.
2. Ping a server
When you ping a server from a workstation, it will run a test to check the connection. Ping your server from each of the connected workstations to identify the issue.
Before starting, enable the Network Discovery on your server computer and any workstations with Error H202:
- On your server and workstations, launch the Windows Start menu.
- In the search, enter Network and select Network and Sharing Center to open.
- Click on Change advanced sharing settings.
- Check the Network Discovery and File and Printer sharing sections and make sure Turn on network discovery is selected.
Now, get the server name from your server computer.
- Launch the Windows Start menu on your server computer.
- In the search field, type Run and hit Enter to open it.
- Enter cmd in the Run window and click OK.
- In the prompted cmd window, type ipconfig/all and hit Enter.
- Move to the Windows IP Configuration section, find the Host Name. You will see the server name on the right.
Note down the host name and copy it to a word document or in a Notes file to access it quickly.
Move back to your workstation to test the server and then proceed with the below steps:
Note: These steps are a bit complex; we recommend you contact an IT professional for help if you are not a techie.
- On your workstation, launch the Windows Start menu.
- Type Run into the search and click Enter to open Run.
- In the prompted Run window, type CMD and press Enter.
- Type “ping [your server name],” and click Enter. Here brackets are just for reference, no need to include them around your server name.
![]()
- Repeat the above steps on each connected workstations.
Summary
If you share your company file over the network with multiple users, the QuickBooks Database Server Manager stopped issue can make it challenging. This is because running the QBDSM is necessary to host your company file. But don’t worry; we have covered all the possible scenarios where you may face the issue and the troubleshooting to address it.
Hopefully, this has helped you run the Server Manager and collaborate with users seamlessly without any interruption. For further issues, we recommend you connect with QuickBooks professionals and enjoy the assistance. Dial +1-866-408-0444 and talk to an expert now!
