
 Accounting
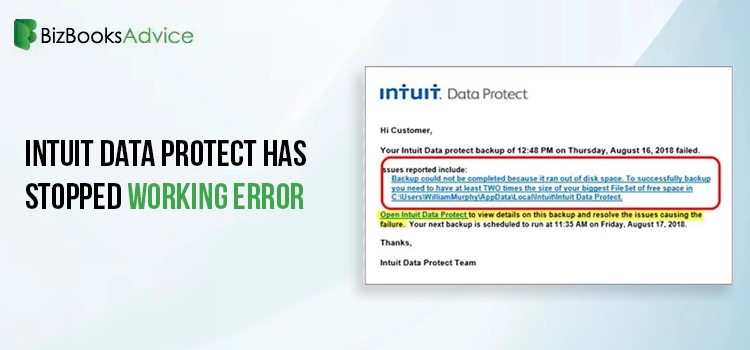
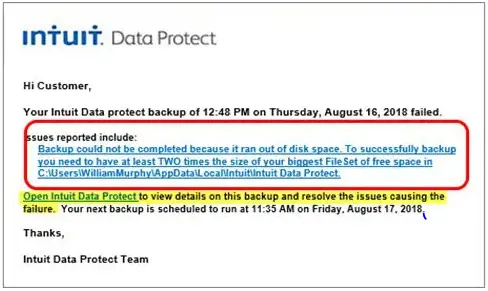
From the small scale to the large scale business enterprises keeping the company data secure and encrypted is the foremost choice. Considering the importance of data security, QuickBooks has launched the Intuit Data Protect service, which lets the companies protect their QuickBooks data from corruption, loss or damage. Sometimes while using this service, users started discovering Intuit Data Protect has stopped working error. Moreover, it comes up with the alert notification stating “Intuit Data Protect backup Failed: Firewall or Connection Issues.”
Unfortunately, if you too are the culprit of the Intuit Data Protect Backup failed issue then use this guide which will act as a savior to resolve the issue. Thus, it would help you in generating the company file backup without encountering any further issues.
If you are not a tech-savvy person and facing issues resolving the Intuit Data Protect Has Stopped Working issue, then stop worrying. Instead, place a call at the helpline number at +1-866-408-0444 and let our QB professionals handle the issue on its own under the expert’s supervision.
What Causes QuickBooks Intuit Data Protect to Stop Working?
Facing the QuickBooks Intuit Data Protect Not Working issue while generating the backup of the company data isn’t a big deal if you know what’s exactly creating the problem. Therefore, to help you out, we have come up with all the possible root causes that might trigger the issue for finding a timely resolution.
- Setting up the Windows Firewall Permissions correctly is very important to complete the backup process smoothly. But if the permissions to run Intuit Data Protect are not configured properly, it might prevent users from scheduling the backup. Resulting to the Intuit Data Protect to stop working issue.
- Another reason the Intuit Data Protect isn’t responding is when there are any sort of disruptions with the network connection.
- If the QuickBooks Desktop or the Intuit Data Protect service is not updated timely to the recently available version then the users might results in Intuit Data Protect no longer working issue.
- Sometimes, the users come across this issue when your system doesn’t have enough storage space (RAM) to conduct the backup of the company file.
- It could be quite possible that the Intuit Data Protect web address isn’t already registered as a trusted source within your browser settings.
- There might be the possibility that you are operating the IbuEngHost.exe file on the Windows server instead as an admin user.
- You may also get the Intuit Data Protect has stopped working error message due to the presence of some damage or corruption with the .NETFramework.
Why QuickBooks Data Protect Has Stopped Working?
Below, we have described the different instances when you come across the Intuit Data Protect No Longer Working issue.
- Scheduled Backup Not Working
- Intuit Data Protect Not Visible On Your Computer
- Installation Issues With Intuit Data Protect
- Login Errors faced while running the Intuit Data Protect
- Misplaced IDP Icon in Windows taskbar
- Backup Failures encountered due to lack of network connectivity
- Intuit Online Backup Not Responding
Precautionary Steps Before Fixing Intuit Data Protect Error
Before fixing the Intuit Data Protect not working QuickBooks Desktop error, you must consider some key points in your mind.
- The users must cross-verify that they are accessing a valid and active Intuit Data Protect subscription to generate the company file backup.
- Make sure that your system must have enough storage space for getting the backup of the company file via Intuit Data Protect.
- Another important point that you mustn’t miss is getting the latest updates of both QuickBooks Desktop and Intuit Data Protect.
- You must also verify that the company file you are trying to backup doesn’t contains any sort of damage or corruption.
Solutions for Intuit Data Protect Backup Failed Problem
If you are affected with the Intuit Data Protect Backup Failed issue, then it’s beneficial to get it fixed soon. For that, you must try performing the solutions described below in the same manner as listed to prevent further discrepancies.
Solution 1: Start Checking the Settings of Windows Firewall to Ascertain It’s Not Bothering IDP While running
For the smooth running of the Intuit Data Protect, it is important to give proper permissions to use the service. Therefore, to ensure you have enough firewall permissions to access the important files, try implementing the steps outlined below.
Uploading Some Crucial Files With the Windows Firewall
- Initiate the process by opening the Start menu and then inserting “firewall” within the required text field.
- After this, opt for the Allow an app through Windows Firewall followed by the Allow another app option.
- When you are done till now, tap the Browse option and jump to the “Program Files (x86) >> Common Files >> Intuit >> Data Protect.”
- You must click the highlighted QBIDPservice.exe and then proceed with the Open tab.
- Then opt for the Network Types and then make sure that the checkbox of Private is chosen. Later on, you need to go with the Add option to move ahead.
- Furthermore, you must resume with step 4 and 5 again for the files naming IBUEngHost.exe and IntuitDataProtect.exe. Then, when you get the message on the screen stating that the files already exist, it means that you are good to go.
Adding Up of the Intuit Data Protect With Your Trusted Sites
- First of all, launch the Start menu and input “Internet Options” in the search panel to open a new window.
- Now, you simply choose the Security tab and, after that, the Trusted Sites option.
- Following this, you must opt for the Sites option and start mentioning the following websites. Here, you also have the option to copy, paste or insert the websites manually and then go with the Add option.
- backup.com
- *.intuit.net
- *.intuit.com
- *.intuitdataprotect.com
- *.quickbooks.com
- workplace.intuit.com
- emerald.backup.com (a new trusted site that updates your Intuit Data Protect certificates)
- Afterwards, the users must verify that they have left the checkbox stating “Require server verification (https:) for all sites in this zone” unmarked.
- When you are done making the relevant changes accurately, proceed to the Close and then the OK tab.
- Furthermore, the users must ascertain that you are able to launch the Intuit Data Protect certificate site properly. Opening this site successfully will help you remove the issues that may evoke during the backups.
- At last, try to get the backup with the help of Intuit Data Protect and verify whether you are still encountering the same issue or not.
Solution 2: Get Ready to Fix the Issue By Running the Intuit Data Protect Diagnostic Tool
With the help of the IDP tool you can investigate the space available in your computer, Windows components you are using such as .NETFramework and Intuit Data Protect version. Besides this, you may also use this tool to spot that you can easily connect with the backup server without facing any technical glitches.
- Primarily, find the IDP icon, right-click on it to choose the About Intuit Data Protect option.
- After that, you simply need to use the Ctrl + F2 keys to bring up the Intuit Data Protect Diagnostic tool.
- When you are done till now, select the Run Diagnostics tab.
- Later on, if you spot that the tool is encountering any sort of issues then you will receive an error window on the screen.
Solution 3: Getting Rid of the Unnecessary Internet Explorer’s Cache, Cookies And the Temporary Files
Sometimes, the users might also resolve the Intuit Data Protect has stopped working issue by erasing the Internet’s explorer browsing history. Doing so will help the users in installing the backup easily on the device as it makes more space in your device for getting the backup file. For the detailed procedure, you must implement the stepwise instructions prescribed below.
- For the removal of the unrequired cache files, immediately open Internet Explorer on your workstation.
- After that, move to the Tools menu and then the Internet Options. Herein, if you fails to get the Tools menu, use the Alt key to get the hidden tabs.
- Moving ahead, proceed to the General tab > Delete option, which is available right beneath the Browsing History section.
- Presently, what you require is to mark the following checkboxes i.e, : Temporary Internet files and website files, Cookies and website data, History, Form Data, and In Private Filtering. On the other end, ascertain that the checkboxes beside the Preserve Favorites and website data remains unmarked.
- Once you are done with the above steps, hit the Delete option to erase all of the items.
- Furthermore, switch to the Content tab and go with the Clear SSL State followed by the OK tab.
Solution 4: Confirming that the IbuEngHost.exe isn’t Running as the Windows User
You must undertake the following steps carefully to assure that the IbuEngHost.exe isn’t running as the Windows user on your workstation.
Steps to See if the File is Running As A System
- In the unital phase, go to the taskbar, right-click on it and then switch to the Start Task Manager option.
- After that, you must browse to the Details tab and start searching for the file named as “IBUEngHost.exe”. Herein, you must look into the matter that the file has the Username as System. Also, check that the Status is set as Running.
When you Notice that the IbuEngHost.exe Isn’t Running as System
- To initiate the procedure, the users first need to download the new installer according to their QuickBooks version.
- Afterwards, access the location where you have stored the installer’s downloaded setup file.
- When you find the installer field, right-click on it to choose the highlighted Run as Administrator option from the expanded list of options.
- Once you are ready then start searching for the installed IbuEngHost.exe file again from the Task Manager. Herein, it is necessary that the users must review that the status is running and the User name is verified as System.
- At the end, you must try getting the back of the Intuit Data Protect and see whether you are still confronting the issue.
Solution 5: Be Ready With the Updated QuickBooks Desktop & Intuit Data Protect
Instructions to install the Latest updates of the Intuit Data Protect
- To update the Intuit Data Protect, open it and then move to the Help menu.
- After this, you need to choose the Intuit Data Protect option from the available list of options.
- When you are done till now, jump towards the Get Updates option.
- In the next step, choose the Arrow button from the toolbar to install the downloaded IDP updates.
- Thereon, you must right-click on the IPD icon and then hit the About Intuit Data Protect option.
- Conclude the entire process by hitting the Update option and then accomplish the process by tapping the OK button.
Stepwise Instructions To Install the Latest Version of the QuickBooks Desktop
Before moving ahead with the process, you must make sure that you have installed the updated version of the QuickBooks Desktop. If not, then switch to the Product Information screen and review the QuickBooks version you are presently working on. Herein, we have described the most recently launched QuickBooks versions, which are as follows:
- QuickBooks 2024 R7_52
- QuickBooks 2023 R13_30
- QuickBooks 2022 R16_30
- Then when you see that you are accessing the older QuickBooks Desktop version, get the latest version. For that, simply move to the Update Available and then hit the Install Now tab.
- Conclude the process by assuring that you have installed the updated version of the QuickBooks Desktop on your device.
Summarizing The Above!!
We hope that now you can easily resolve Intuit Data Protect Has Stopped working issue using this post. Thus, it will help you in creating the backup without any further delays. So, if you are still confronting this issue, then stop wasting more time and consult with our QB experts at +1-866-408-0444 for help.
