Create QuickBooks Portable Company File- Let’s Explore How to Do So.

- By Jonathan Browns
- Aug 21, 2024
- Accounting
- 7 min read
Portable company files are the best way to send the data compactly, especially when you don’t wish to share the full backup. Moreover, the best thing is that portable company files save accountants precious time by preventing them from relying on numerous storage solutions for backup. If you are looking for proper stepwise directions that can guide you to create QuickBooks portable company file, this guide is the key to the solution.
In this write-up, we have provided the proper stepwise instructions to create and open the company file. We have also illustrated the solutions you must implement when you face issues while opening a portable company file.
Do you require proper expert guidance to create a QuickBooks portable company file? If that’s so, then you must reach out to our QB experts by dialing +1-866-408-0444, and they will assist you in the best possible manner.
Let’s Understand How to Create & Open Portable Company Files in QuickBooks Desktop
Do you need help creating and opening portable company files in QuickBooks Desktop? Then, you must no longer worry and follow the steps below to shift your data into a compact form easily.
First Stage: Install the Improved Version of QuickBooks
Before you create QuickBooks portable company file, it’s essential to install the Latest version of QuickBooks Desktop. To do so, follow the steps below without skipping any steps to prevent further discrepancies.
- In the first phase, cross-examine the version of QuickBooks Desktop you are presently using to ensure you are using the updated one.
- Launch the QuickBooks Desktop application and open the Product Information window by hitting the F2 key.

- To install the updates, users must choose the Update Available option and then tap the Install Now button.
- Right after this, users must wait for a while until the update process is complete. You may notice that the update process may take some time to install on your device successfully.
- Finally, all you need to do is open the QuickBooks Desktop software after completing the update process.
Second Stage: Establish a Backup of the Company File
The portable company files are the best alternative when you are looking for a file that can be shared or moved easily, especially if you don’t require a full backup. Herein, you must know that the portable data file can’t be the alternative solution for the full backup. This is so because it won’t comprise any message templates, logos, or images. However, it doesn’t involve .tlg or .log files, Statement Writer, or Fixed Asset Manager files.
Follow the detailed instructions below to automatically create a company file backup. Alternatively, you may also conduct the backup manually.
- Initially, open the QuickBooks application and head to the File menu.
- Right after this, you must click Switch to Single-User Mode and hit the File menu again.
- Moving onwards, hit the Backup Company option and then the Create Local Backup.
- Now, in the window that emerges on the screen, choose the Local Backup option > Next.
- You must access the Local Backup Only section, hit the Browse option, and then pick a suitable location to restore the file.
- The users must fix the number of backups they must prepare, which is optional.
- This will eventually start running a test to confirm that your file was in good shape before you began saving it.
- After that, you are all set with the above-mentioned steps; tap the OK button > Save it Now > Next.
- As a result, the QuickBooks application will eventually generate a single backup data file. Once you are all set to go, it will instantly start displaying a Confirmation message.
Read Also- How to Update Your QuickBooks Company File: A Quick Guide
Third Stage: Initiate the Process of Creating a Portable Company files in QuickBooks Desktop
Now, you must start creating portable company files in QuickBooks Desktop with the help of the following steps.
- At first, you should just launch the QuickBooks application and then try signing in to your account as an admin.
- Subsequently, browse to the File menu and choose the Create Copy > Portable Company File > Next option.
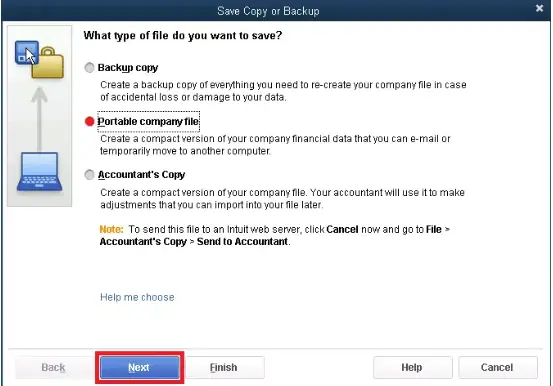
- Right after this, you are required to assign a new name to the portable company file. While allotting the name, make sure it is distinct from the name of the other file, which makes it easier to identify from the available ones.
- Now, begin choosing the right location to save the portable company file. The users must be very particular about the location they choose, as it should be easily accessible.
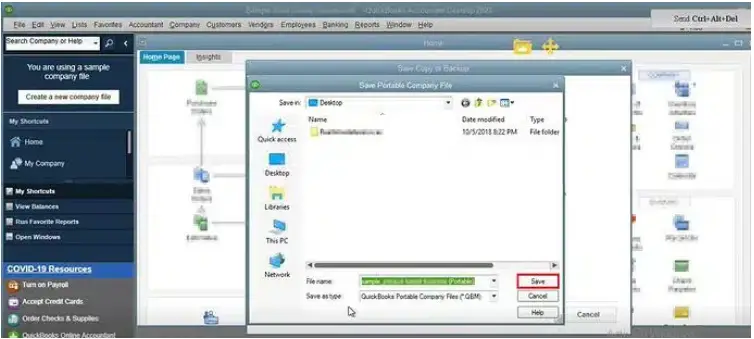
- Finally, click the Save option and then the OK button after accurately making all the necessary changes.
With this, you have a portable company file that you can send either online or via USB. The users will discover that the file name is reflected as “[Unique company file name].qbm” on their computer screen.
Read More: Step-by-Step Solutions for QBCFMonitorService Not Running Issues
Fourth Stage: Begin Launching a QuickBooks Portable Data File
After constructing the portable company file, you are required to open it for review by performing the steps instructed below.
- To start the procedure, open the QuickBooks application and then sign in to the application with the correct admin credentials.
- After this, tap on the File menu from the top and, from its sub-menu, choose the Open or Restore Company option.
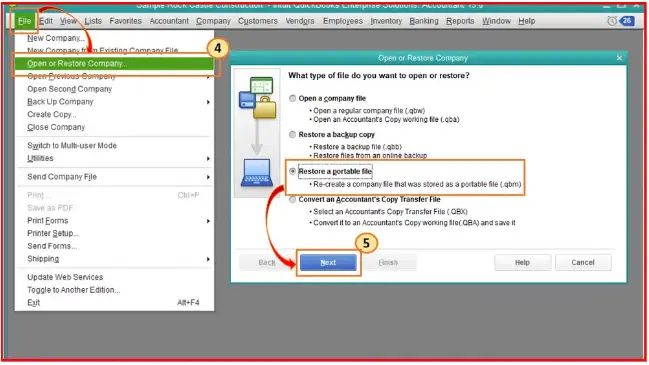
- Subsequently, the users must select the Restore a portable company file > Next option and proceed with the ongoing process.
- You only need to pick the portable company file, reflected with the name [Unique company file name].qbm, and hit the Open button.
- Once you are done, thoroughly review the notes from the “Where do you want to restore the file” page before proceeding to the next step.
- When you are all set to open up the file, click the Save button.
- Furthermore, if you attempt to launch the portable company file, QuickBooks will eventually re-index your data.
Address the Issues Associated With Portable Company file in QuickBooks Desktop
There are certain instances when the users may encounter issues while creating or opening the portable company file. So, to fix the issue, the users must closely implement the solutions described below.
Solution One: Establish a Manual Copy of Your Data File
- In the initial phase, the users are required to tap the Windows logo key to open the Start menu.
- Afterwards, you must include “File Explorer” in the search column and then hit the Enter key to proceed.
- Consequently, it will launch the File Explorer window and locate the folder containing the data file, which is basically the QB folder.
If you get the issue while preparing the portable company file
- Primarily, you need to look for the data file with the .qbw extension, which is reflected as [Your Company File].qbw.
- Once you get the portable company file, right-click on it to choose the Copy option.
- Now, move back to the Desktop and right-click anywhere on the screen to click the Paste option.
- You are supposed to launch the QuickBooks application but not your data file.
- Furthermore, choose to open or restore an existing file and then open a sample company file option.
- Following this, the users need to access the data file which they have copied earlier and then paste them into the Desktop.
- Moving to the next step, head to the File menu and hit the Create Copy option.
- Subsequently, click the highlighted Portable company file option and the Next button.
- Later on, all you require is to perform the instructions displayed on the screen to launch another portable company file.
- If you can generate a portable data file, it means some problems are associated with the data file location. All you require is to copy the data file, which will be considered your main file. Then, edit the name of the file and add “OLD” at the end of the file name so that you can’t use it anymore.
Read Here: How to Verify and Rebuild Data in QuickBooks Desktop
When you receive an error while restoring a portable company file
- Commence the procedure by locating your data file with the .qbm extension, which must be presented as [Your Company File].qbm.
- Now, all you need is to right-click on the portable company file. Then, you must pick the Copy option from the extended list of options.
- After this, you are required to paste the copied file into your Desktop.
- Soon after that, the users need to launch the QuickBooks application, not the company file, to continue the ongoing process.
- Furthermore, you need to pick the Opening or Restore an existing file option and then the Restore a portable Company file option. Later, you must browse your computer and then launch the portable data file that you copied earlier, and you are all set.
Second Solution: Try to Open a Sample Company File
The users may also start using the sample company file to construct the portable sample company file. Doing so will help you determine whether the issue lies with your data file.
- Begin the process by launching QuickBooks Desktop on your PC and picking the Open a Sample File option. Then, you must launch one of the sample companies.
- Now, you are required to construct a portable data file with the instructions explained ahead in this post and then start opening the sample data file.
- Once the portable file is generated accurately, you are required to save it on your Windows Desktop.
- Moving onwards, return to the File menu and then click the Close Company/ Log-Off option.
- After completing the above steps, you must open the portable company file.
- Next, if you can recover the portable data file from the sample company, then it’s possible that the file is generating certain problems.
Summarizing the Above!!
That’s all about how to create a QuickBooks portable company file and then open it. We hope that the above steps will help you generate a compact version of the file so that you can easily email it to the Accountant. But if you encounter any problem assessing the portable company file, then immediately connect with our QB experts at +1-866-408-0444 for help.
About The Author

Jonathan Browns
Jonathan Brown is a trained QuickBooks professional with 10 years of experience in the accounting sector. Moreover, he is passionate about helping businesses reduce the stress of managing accounts. Also, he is proficient in assisting entrepreneurs and small business owners to use QuickBooks and enhance their accounting experience.

Intuit has stopped providing new subscriptions for the QuickBooks Desktop 2024 and previous versions.
You can migrate to QuickBooks Online or switch to QuickBooks Desktop Enterprise.
Recent Posts
-
Fix QuickBooks Error 6073 99001- Issue Opening Company File
-
How to Resolve QuickBooks Desktop Update Loop Issue?
-
QuickBooks Desktop Enterprise: All-in-One Accounting Solution
-
Proven Methods to Fix QuickBooks Error Code 12000 Smoothly
-
Rectify QuickBooks Error 1603 While Installing QB Desktop
Frequently Asked Questions
Choosing us can offer you a myriad of competitive advantages over the other services. Some of the main advantages are stated in the below-given steps:
What is the major difference between a portable company file and a backup file?
The portable company files is the compact form of the backup files which makes it much more convenient to email in the form of attachments to another computer. But, the portable data file doesn’t consist of a full backup, and it won’t carry message templates, logos, or images, which the backup file has.
What steps are included to send a portable company file?
What should I do if I get issues while generating a Portable Company File?
Can I use a Portable Company File to restore my company data?
Can I include custom templates and forms in a Portable Company File?