In the accounting field, QuickBooks has the upper hand in delivering top-notch accounting features that help businesses streamline their daily business operations. Despite being the most preferred accounting solution, sometimes the users might get stuck while performing their accounting operations. However, to address all such concerns, Intuit has launched the QuickBooks Tool Hub 1.6.0.8, a one-stop shop where you can sort all sorts of accounting issues. By accessing this tool, you can use different tools under one roof, i.e., Company File Issues, Installation Issues, Program Problems, Password Reset, Network Issues, Advanced Tools, Help & Support, and address your issues instantly.
In this write-up, you will find detailed information regarding downloading, installing, and using the QuickBooks Desktop Tool hub to resolve all your issues quickly.
Didn’t you have the proper stepwise instructions to get the updated version of the QuickBooks Tool Hub to address your accounting issues? Fret Not! Instead, call us at +1-866-408-0444 and let our QB experts assist you with your issue without causing any further delays.
Fix Issues with QuickBooks Desktop Tool Hub
By getting your hands on the QuickBooks Tool Hub 2025, you can use it to address the following issues smoothly.
1. QuickBooks H-Series of Errors –
With the help of the QuickBooks Repair Tool, you can deal with the issues find while switching to multi-user mode in QuickBooks.
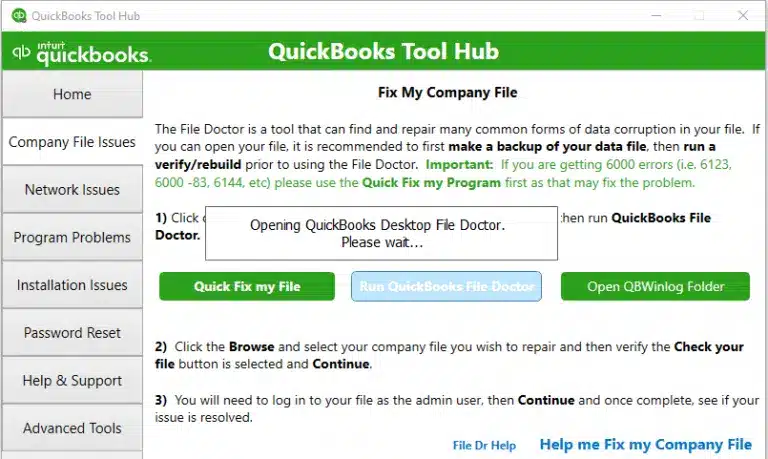
2. Issues Associated With Your Company File –
Did you get stuck while opening the company file and couldn’t proceed further with your ongoing business task? If that’s so, then you can access the Tool Hub QuickBooks and browse the Company File Issues tabs that contain different tools to repair the issues. Herein, you can use Quick Fix My Program and QuickBooks File Doctor tool to address the issues linked with your file.
3. Problems Arise Due to Incomplete or Damaged Installation –
At times, users might encounter missing or damaged files during the installation of QuickBooks Desktop or updates. The interruption in the installation process might be due to incorrect network configuration or interruption due to third-party software. Therefore, to deal with such issues, you can use the QuickBooks Install Diagnostic Tool in the Installation Issues tab.
4. Issues Arise With the QuickBooks Performance / Continuance Crashing –
There are certain scenarios when the users might experience sudden crashing or freezing of the QuickBooks Desktop application. So, by running the Tool Hub QuickBooks, you can address the freezing or crashing of the program issues.
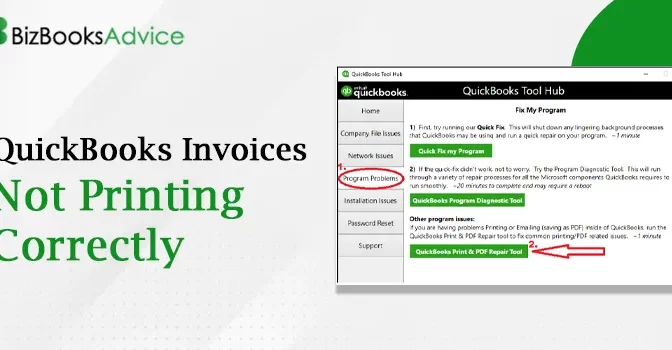
5. PDF or Print-Related Queries –
If you ever get stuck while printing the company files, emails, reports or saving the file in the PDF format, then you don’t have to worry anymore. As you can use the PDF and Print-repair tool via QuickBooks Tool Hub and put an end to the printing issues without any further delays.
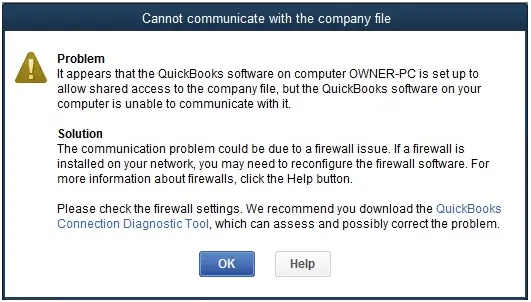
6. Resolve the QuickBooks 6000 Series of Error –
Sometimes, the QuickBooks 6000 series of error might attack the system which makes it it challenging to open the company file on your workstation. There could be several reasons behind this issue which comprises firewall intervention, inappropriate internet settings, or the presence of damage or corruption in the data file. However, to overcome all such sort of issues, you can run the Program Diagnostic Tool present in the QuickBooks Tool Hub.
7. QuickBooks Crashing Issues –
With the latest QuickBooks Tool Hub, you can now resolve the issues when QuickBooks doesn’t work properly. By accessing the Tool Hub, you can easily deal with the crashing issues.
Explaining the Relevance of Accessing the Tool Hub QuickBooks
While running QuickBooks software, users might come across numerous issues, such as printing, installing, and accessing company files, network-related issues, or other program problems. So, to deal with all such issues, you only require Tool Hub QuickBooks on your device to accomplish your daily business operations smoothly. However, there are numerous other benefits of using the Tool Hub, which are as follows:
Easy-To-Understand Interface –
The main interface of the QuickBooks Desktop Tool Hub is very easy to understand and simple to operate even for non-tech users. However, if you are new in QuickBooks and doesn’t have much accounting knowledge you can still use it to address the issue quickly.
One-Stop Shop For All Accounting Issues-
Moreover, another great thing about the QuickBooks Tool Hub is that it is a one-stop solution to deal with any kind of company file issues. However, you can also make use of this tool to configure the common issues which avoids the users in opening the data file.
Free-To-Use –
Another advantage of using the Tool Hub QuickBooks is that it is free. All you need to do is go to Intuit’s main website and download the latest version of the QuickBooks Tool Hub to address all your common QuickBooks-related issues.
Fixes the Issues In Lesser Time –
By accessing the QuickBooks Tool Hub, it gets much more convenient to address the company file, program problems, network-related issues, password reset and installation issues. Now, you don’t have to search on google for different links to find the best way to solve the issue as it can be fixed with the help of one tool only.
Easy to Deal With the Network-Related Issue –
Now, you can easily address the network-related issues faced while running the QuickBooks Desktop application.
System Specifications Required Before You Conduct QuickBooks Tool Hub Download Process
Before getting started with the QuickBooks Tool Hub download process, it is mandatory to keep certain considerations in your mind. As a result, it will help you in running the Tool Hub smoothly on your operating system.
- The users must require a good and reliable internet connection for the uninterrupted downloading of the QuickBooks Tool Hub 2025.
- Another important thing is that the users must verify that the updated version of the Microsoft .NETFramework is installed on your computer. However, if you are having missing update notification regarding the framework then update it and install them on your device.
- Moreover, Microsoft Visual C++ redistributable package is also other important system requirement which is mandatory for the smooth installation of the QuickBooks Tool Hub.
How to Download QuickBooks Tool Hub on Windows 11?
After meeting the system requirements, the users must move ahead to download QuickBooks Tool Hub Windows 11. For that, you are supposed to perform the step-by-step instructions outlined below closely.
- In the first place, use your preferred web browser to get the QuickBooks Tool Hub 1.6.0.8 download on your Windows operating system.
- After clicking on the secured download link, you must hold on for some time and let the QuickBooks Tool Hub Windows 11 download process to gets completed.
- Once you get it downloaded, what you require is to save the downloaded setup file to a secure location from where you can find it easily.
- The processor required to operate the QuickBooks Tool Hub is Intel Core or comparable.
- For printing of the forms, the users must verify that they have Adobe Reader 11.0 or the higher version is recommended.
- Moreover, the users must verify that the storage space must be up to 4 GB.
Install Previously Downloaded QuickBooks Repair Tool Hub
Once you are all sorted with the downloading of the latest QuickBooks repair tool, get it installed to start using this tool. Below, we have described the complete process for installation, lets have a quick glimpse at it.
- Now that you are ready with the updated version of the QuickBooks Tool Hub download, move to the download section.
- When you reach the download section, start looking for the QuickBooks Tool Hub.exe file and double-tap on it.
- With this, you will discover a new window opening on your computer screen wherein you will be asked the set of authentications to install the file.
- Soon after this, the users must hit the Yes tab and then begin the installation process.
- Now, you will observe that the Terms and Conditions window will began appearing on your computer screen. Herein, you must thoroughly review the terms mentioned in the policy carefully to start installing it on your device.
- Afterwards, you are supposed to pick the appropriate Destination folder according to your preference and then hit the Install tab unless you shut down the folder.
- As a result, you will see that the installation process will eventually pop up on your computer screen and then wait until you are done with the installation part.
- Conclude the entire process by hitting the Finish tab to exit from the window.
QuickBooks Desktop Tool Hub: Tools & Usage Explained
When you are all set with the setup of the QuickBooks Desktop Tool Hub application, it’s time to use it. Below, we have described all the components that come under this Tool Hub and their usage.
Home Tab-
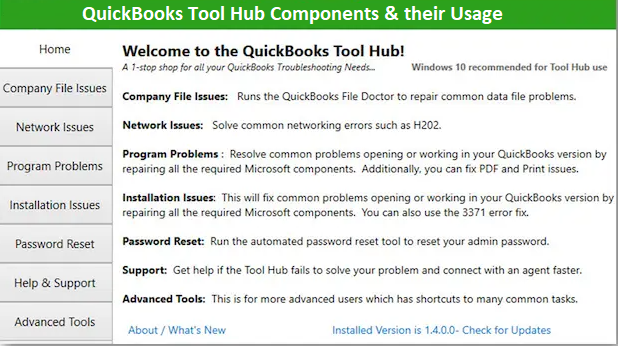
Firstly, when you access the QuickBooks Tool Hub dashboard, you will be presented with a home screen that specifies all the necessary details associated with the tool. Moreover, it is also specified the components which are used for some certain problems.
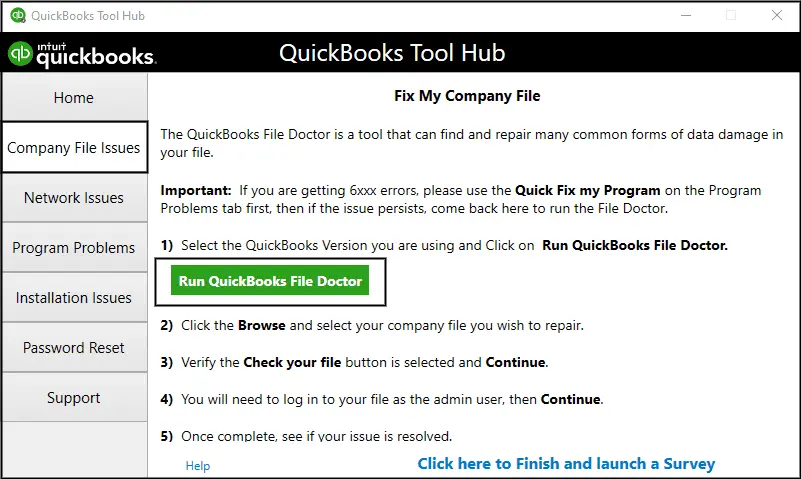
Company File Issues-
Whenever you come across any issues while trying to open the company file on the workstation then you might use the Company File Issues tab to resolve the issue.
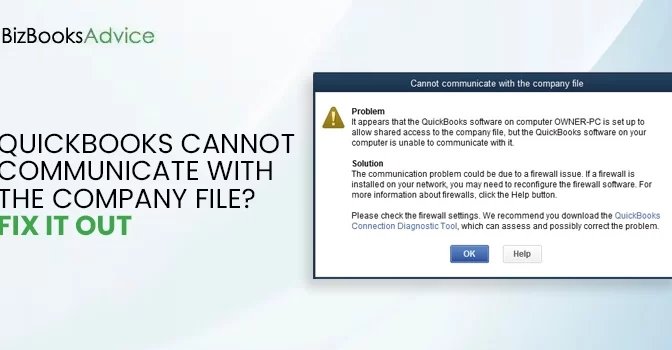
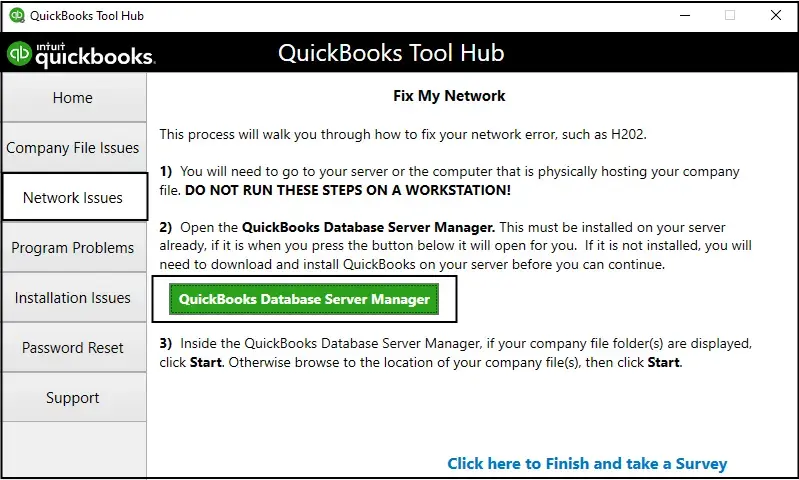
Network Issues-

QuickBooks Tool Hub is a great accounting tool which helps in addressing the network-related issues. Whether you encounter any difficulty while running the QuickBooks in multi-user mode, then you can run the tool hub. Once you reach the QuickBooks Desktop tool hub dashboard, click on the Network Issues tab to troubleshoot network issues like H202, H303, H404, and H505.
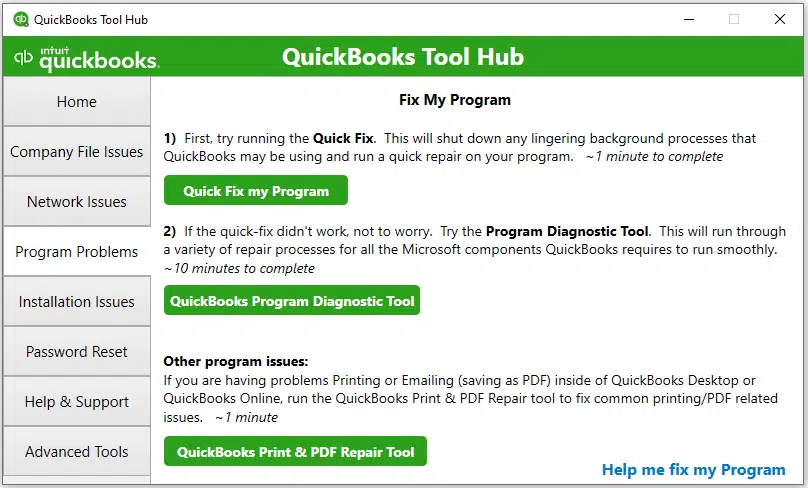
Program Problems-
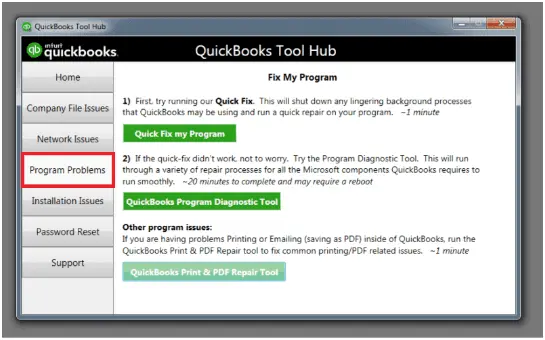
Most often the users might struggle while trying to open or work in the QuickBooks Desktop application. Moreover, you can also use the Program Problems tab to deal with the common PDF and print related issues to avoid possible data issues associated with the company files that are bigger than 1 GB.
Installation Issues-
If you get stuck in the mid of the installation of the QuickBooks Desktop, then you can easily resolve the issue choosing the Installation Issues tab. You can easily troubleshooting the installation issues such as QuickBooks Error 1603, Error 3371, etc.
Password Reset-
The users can make use of the automated password reset tool to recover the admin password. However, it also help you in restoring the QuickBooks login password that you have lost or forgotten.
Help & Support-
You may access the Help & Support tab whenever you require any expert’s assistance to deal with the complicated QuickBooks issues.
Advanced Tools-
Moreover, the users can utilize the common Windows shortcut keys to resolve the common QuickBooks errors instantly.
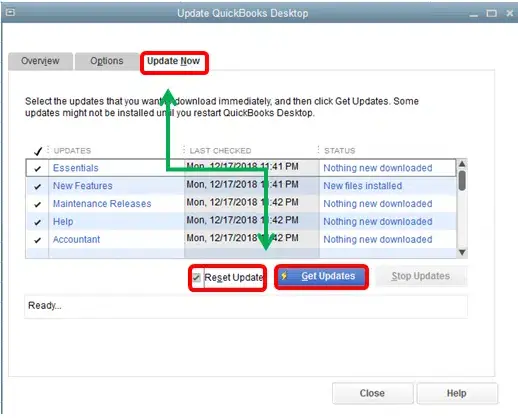
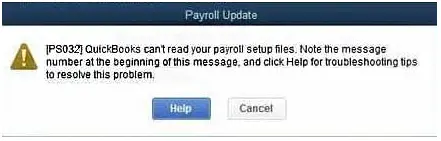
QuickBooks Updates that are Slow or appear to be stuck-
In the newer version of the QuickBooks Tool Hub, you can now deal with the issues when you get stuck while downloading the latest QuickBooks payroll updates. Also, you can resolve the issues you face while installing the upgraded QuickBooks application.
Crux Of This Blog
QuickBooks Tool Hub is a one-stop solution that helps the users to overcome various accounting issues faced while running the QuickBooks program. Thus, it helps you continue with your financial operations easily without any further discrepancies. However, if you are still struggling while operating the tool, then feel free to communicate with our QB experts at +1-866-408-0444 for better results.