Quick Steps to Unapply a Credit Memo in QuickBooks Desktop

- By Jonathan Browns
- Feb 06, 2026
- Accounting
- 7 min read
Have you recorded a payment twice or accidentally overpaid a customer in QuickBooks Desktop? In such situations, you need to unapply a credit memo to correct the overpayment and ensure accurate financial reporting.
In this guide, we explain what a credit memo is, how it works, and how to manage it correctly in QuickBooks Desktop to keep your financial statements accurate.
What is a Credit Memo in QuickBooks?
The credit memo in QuickBooks Desktop is a document used to issue a credit to a customer. It is typically created to:
- Adjust overpayments
- Correct billing or invoicing errors
- Account for returned products
A credit memo can either be refunded or applied to an invoice as a payment or partial payment. All issued credit memos will be reflected on the accounts receivable tab, which can be viewed in the centre section of the customer for future use.
How to Find Credit Memos in QuickBooks Desktop?
Before making any adjustments to overpayment in QuickBooks, you first have to find a credit memo in QuickBooks Desktop. Carry on with the steps instructed below to complete the process.
- Initially, log in to the QuickBooks application and move to the Report menu. Then, opt for the Customers and Receivables option.
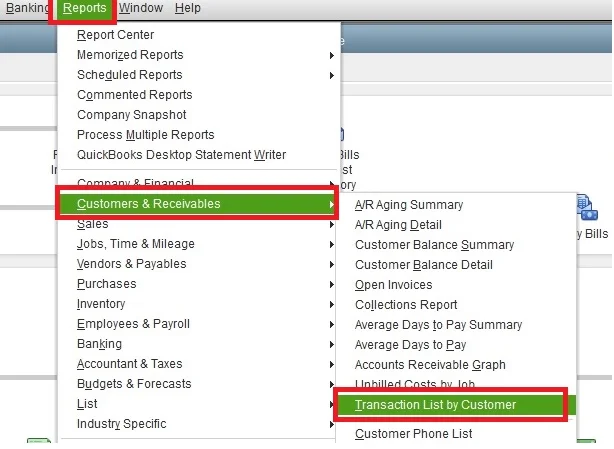
- Head to the Transaction List by Customer by clicking on the drop-down menu list.
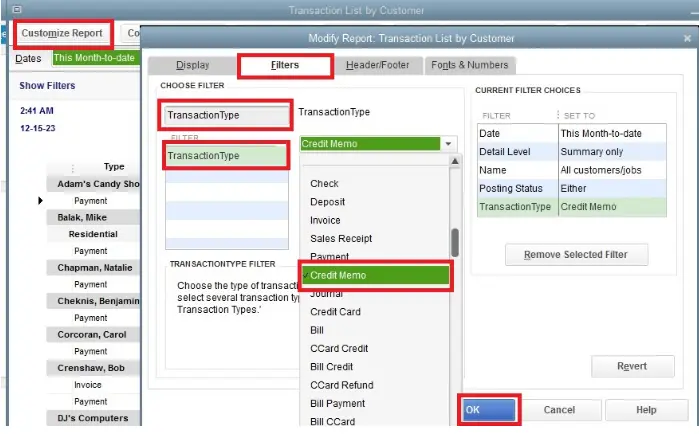
- Choose the Customize Report option and then browse to the Filters tab.
- Now, you need to insert the Transaction Type into the search field.
- Next, opt for the Transaction Type and hit the Credit memo by clicking the drop-down arrow.
- Finally, you will be able to get all the Credit memos available in QuickBooks Desktop.
Understanding Different Ways to Unapply a Credit in QuickBooks
Once you find the credit memo, you can unapply a credit in QuickBooks Desktop. Below, we have listed some of the stepwise instructions to unapply a credit in QuickBooks.
- You can generate credit in QuickBooks to get a refund for the overpayment amount.
- Besides this, you can also generate a journal entry to write off the overpaid amount.
- The users can also apply the credit to an unpaid invoice.
- Above all, you can apply the credit to the next invoice that the customer needs to pay.
Learn More:- QuickBooks Out of Memory Error
How to Create a Credit or Refund in QuickBooks Desktop?
You have the option to either refund the value or create a credit memo. Follow the steps below to create a credit memo.
Steps for Creating a Credit Memo
- Click on the Create Credit Memos/Refunds from the Customers menu.
- Select the customers from the Customer Job drop-down menu list.
- Provide the items you offer on credit to your customers and hit the Save & Close tab.
Select How you Wish to Handle the Credit
From the Available Credit window, you can pick the suitable option for credit and then click OK.
1. Keep as Credit: QuickBooks will insert a negative amount into the Accounts Receivable section to reflect the credit memo. This credit can be used for paying in the future. However, if you keep it as an available credit, it will reflect in the customer payment window.
2. Give a Refund: Another option is that you can also get the refund from the customer via cash or a check. If they pay via credit card, you can also get the refund on the credit card.
3. Apply to an invoice: QuickBooks will present you with a window to select an invoice to apply the credit to.
How to Unapply a Credit Memo In QuickBooks Desktop Smoothly?
Whenever the customers mistakenly made an overpayment or recorded a credit to the invoice twice, they need to unapply a credit memo in QuickBooks. Doing so will help in fixing the wrongly made credit memo and help you in managing the books of accounts easily.
Method 1: Remove a Credit From an Invoice
Carry on with the following instructions to remove a credit from an invoice that was wrongly applied.
- Initially, access the credit that you wish to unapply to an invoice.
- After this, double-tap on the invoice and choose the Apply Credits tab.
- Make sure that you unmark the checkbox for credit in the Previously Applied Credits window.
- When all the changes are made, hit the Done option.
- From your invoice, head to the Save and then the Close tab.
Method 2: Remove a Credit From a Bill
The following are the stepwise instructions to remove a vendor credit from a bill.
- Firstly, you must look for the vendor credit.
- Choose the Bill option to edit the credit into a bill and hit the Save & Close tab.
- Launch the bill and hit the Credit option to change it, and click the Save & Close tab again.
- When you are asked to change the transaction, tap on the Yes option.
Read More:- QuickBooks Insufficient Memory or Disk Space
Conclusion
We hope that this blog will help you understand how to unapply a credit memo in QuickBooks Desktop. Correcting misapplied or duplicate payments ensures cleaner financial reports and saves valuable time. If you are still struggling while unapplying a credit, then connect with our BizBooksAdvice professionals for help.
Frequently Asked Questions (FAQ’s):-
Question 1: How to unapply credit in QuickBooks Online?
Ans. To unapply credit in QuickBooks Online, you must perform the following steps.
- Initially, move to the official Intuit website and click the Reports menu.
- Choose the Find report by name field and hit the Open Invoices option.
- Now, pick the amount you wish to apply and select the payment date.
- Thereon, choose the Save and Close option.
Question 2: How to stop QuickBooks from automatically applying credits?
Ans. To turn off QuickBooks from automatically applying credits, perform these steps:
- Firstly, log in to QuickBooks Online as the admin user and hit the Gear option.
- Choose the Account & Settings option and click Advanced in the left sidebar.
- After that, scroll down to Automation and hit the Edit menu.
- Thereon, toggle automatically apply credits to OFF and hit the Save > Done option.
Question 3: What is a credit memo in QuickBooks?
Ans. A credit memo in QuickBooks is used for generating a credit for a customer, with the intent that it will not be refunded or applied to an invoice as a payment or partial payment.
Question 4: How to handle overpayments in QuickBooks?
Ans. You must perform these steps to handle overpayments in QuickBooks.
- Initially, apply the credit and click + Create, followed by the Receive payment option.
- Now, choose the customer, credit, and the invoice.
- If you see that the credit balance remains from the overpayment, you can apply it toward another open invoice by clicking on it.
- Thereon, hit the Save and New or Save and Close option.
Question 5: What happens if you overpay an invoice?
Ans. When a business receives an overpayment, it needs to notify the customer to give a refund for the excess amount or apply it as a credit to future purchases.
About The Author

Jonathan Browns
Jonathan Brown is a trained QuickBooks professional with 10 years of experience in the accounting sector. Moreover, he is passionate about helping businesses reduce the stress of managing accounts. Also, he is proficient in assisting entrepreneurs and small business owners to use QuickBooks and enhance their accounting experience.

QuickBooks Desktop, Payroll or Enterprise
Advanced Support for QuickBooks Desktop, Payroll & Enterprise Solutions
From payroll tax setup, direct deposit issues to Enterprise performance tuning and Desktop upgrades - our QuickBooks experts provide accurate and stepwise assistance. Get dependable support designed to minimize downtime and maximize efficiency.
Recent Posts
-
This QuickBooks Company File Needs to Be Updated: A to Z Guide
-
Renew QuickBooks Subscription: Desktop & Online Renewal Guide
-
QuickBooks Online Login: Sign in to Access Your QB account
-
Change EIN in QuickBooks: Complete Guide for Desktop, Online & Payroll
-
How to Fix QuickBooks Error 15241 During Payroll Update